30/03/2017

How do you back up your Mac?
It has happened to many people: you’re working away on your Mac, and suddenly the system freezes. You try to restart, but to no avail: your Mac has crashed. We all secretly know that we should make a backup, but many “forget” to do so.
We hear almost daily from customers who don’t have a backup of their system, and that’s a shame. Family photos, important reports, and other documents are all gone in an instant. The old advice ‘prevention is better than cure’ is certainly applicable here. That’s why in this blog we explain how to easily make a backup of your Mac.
Backups are stored on the internal drive, but it is recommended to also save them on an external hard drive. If something ever happens to the internal drive or your Mac, you can restore the entire system on another Mac, and all your data will be back in place in no time.
When you connect the external drive to your Mac, you will be asked if you want to use the drive to back up your Mac. Choose Yes and follow the instructions. If you previously selected No, you can still designate the drive as a backup disk: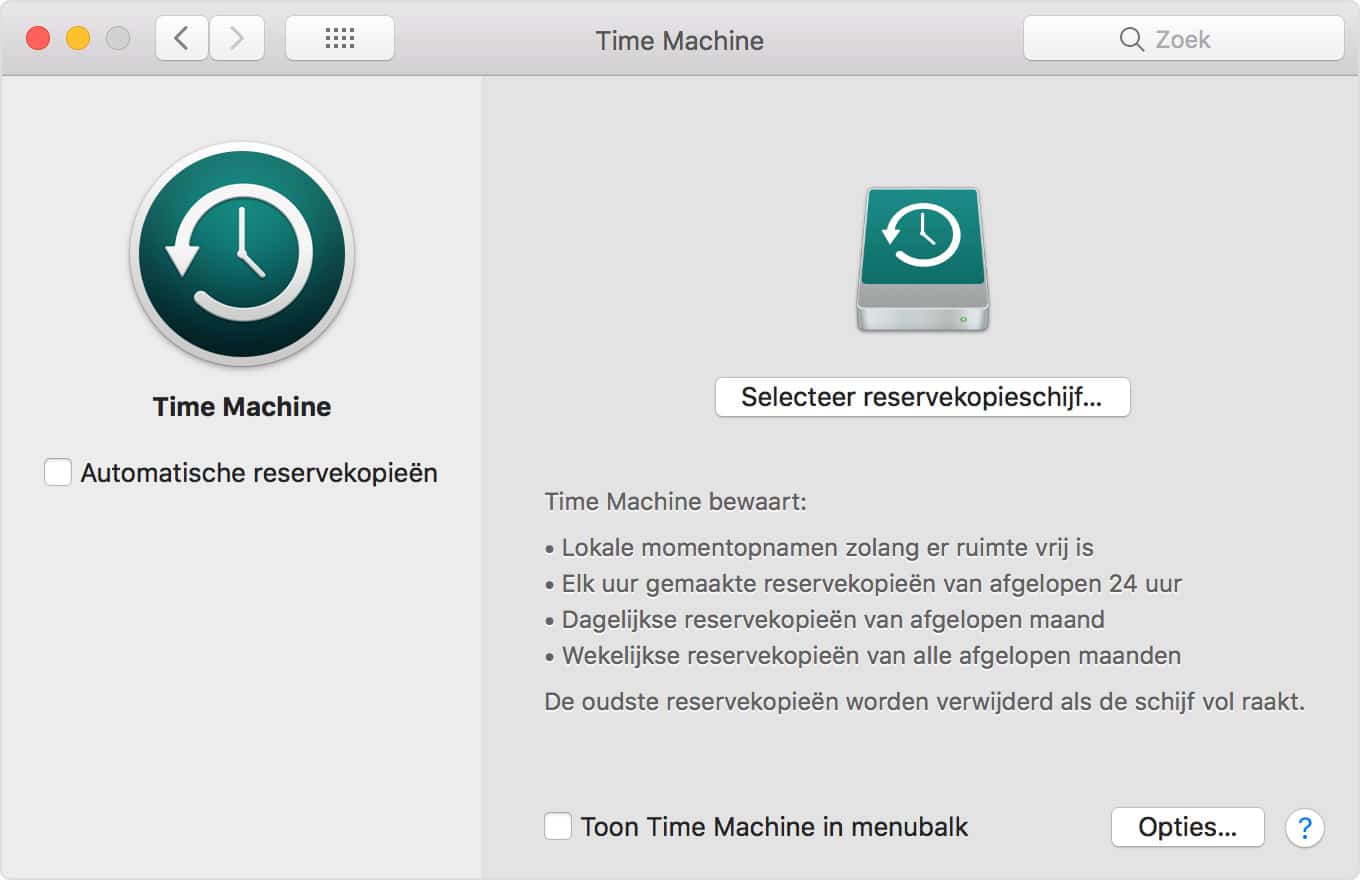
If you don’t want to include all folders in the backup (due to space constraints or privacy concerns), you can use Options to select the items to exclude from the backups. By default, Time Machine does not include system files or the Trash, but there are many other folders you don’t necessarily need to back up. Think of Dropbox, iCloud, and Google Drive, as they already have backups stored elsewhere. You can also skip virtual machines, Steam libraries, and your downloads folder. The same goes for large apps like Office and Creative Suite. If something goes wrong, you can easily download these again from the provider. You can decide how extreme you want to be: exclude all system files and all apps? Or perhaps include a bit more, so you don’t have to manually download everything in case of problems? The choice is yours. You can also specify whether backups can be made when running on battery power or if you want a notification when an old backup is deleted.
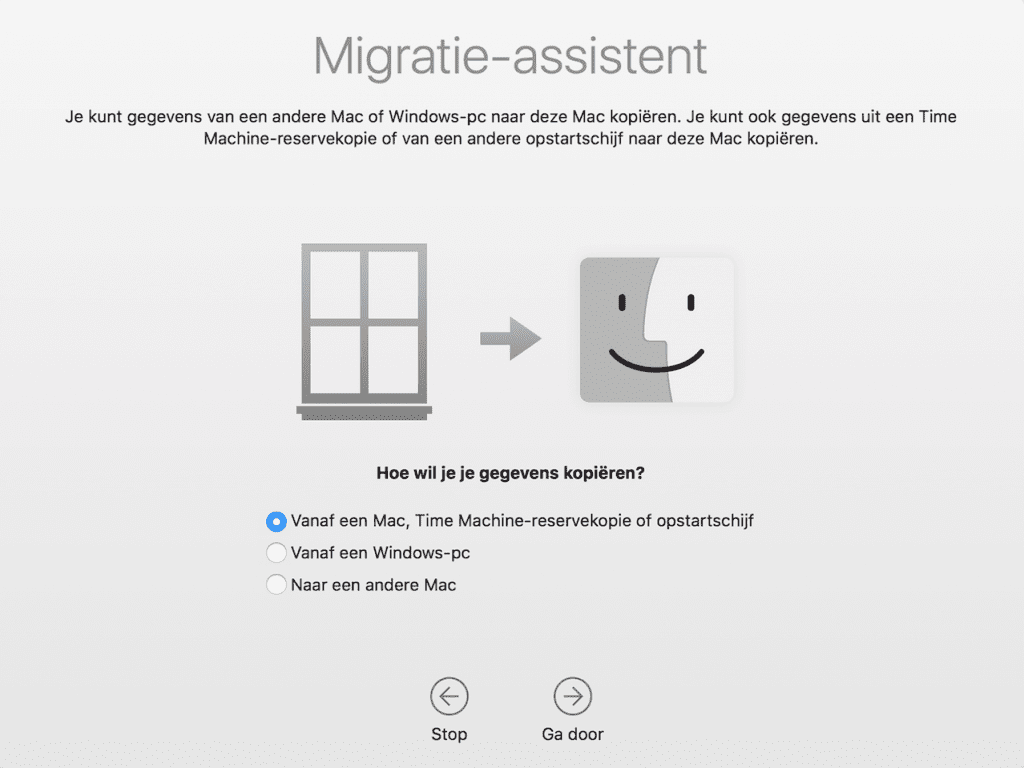
On a new device, you can easily restore the Time Machine backup by choosing Migration Assistant during setup and selecting From a Mac, Time Machine backup or Startup disk. Then, choose the backup you want to restore.
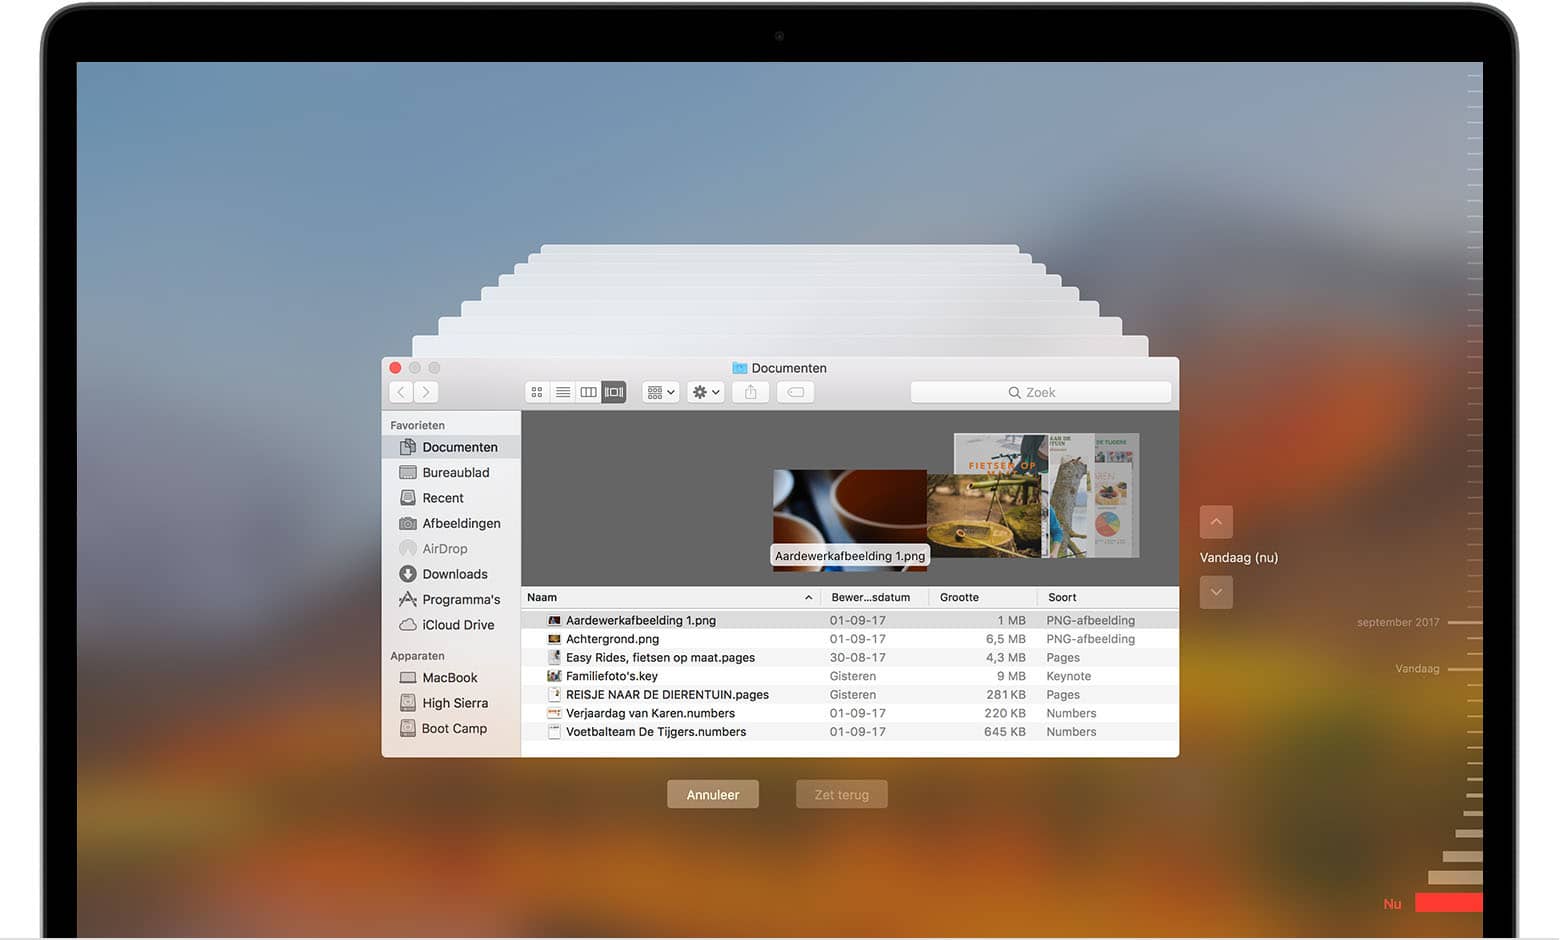
If you want to restore specific items from a Time Machine backup, open the window for the item you want to restore. For example, if you want to restore a file that you accidentally deleted from your Documents folder, open the Documents folder. In the Time Machine menu, choose Enter Time Machine or click Time Machine in the Dock, and search for the items you want to restore. You can use the timeline on the edge of the screen or the up and down arrows. Select an item and press the spacebar to preview it, and click Restore to restore the selected item. Control-click the item for other options.
We hear almost daily from customers who don’t have a backup of their system, and that’s a shame. Family photos, important reports, and other documents are all gone in an instant. The old advice ‘prevention is better than cure’ is certainly applicable here. That’s why in this blog we explain how to easily make a backup of your Mac.
macOS Sierra - Making backups with Time Machine
You can make a backup of your iMac, MacBook, MacPro, or MacMini using Time Machine. This is a free application from Apple that allows you to make backups of your entire Mac, including system files, programs, music, photos, emails, and documents. When Time Machine is enabled, a backup of your Mac is automatically created and updated every hour (unless you turn off Automatic Backups). If you accidentally delete or change a file, you can recover it using Time Machine.Backups are stored on the internal drive, but it is recommended to also save them on an external hard drive. If something ever happens to the internal drive or your Mac, you can restore the entire system on another Mac, and all your data will be back in place in no time.
When you connect the external drive to your Mac, you will be asked if you want to use the drive to back up your Mac. Choose Yes and follow the instructions. If you previously selected No, you can still designate the drive as a backup disk:
- Go to System Preferences
- Select Time Machine
- Click Select Backup Disk
- Choose the drive you want to use for the backup
If you don’t want to include all folders in the backup (due to space constraints or privacy concerns), you can use Options to select the items to exclude from the backups. By default, Time Machine does not include system files or the Trash, but there are many other folders you don’t necessarily need to back up. Think of Dropbox, iCloud, and Google Drive, as they already have backups stored elsewhere. You can also skip virtual machines, Steam libraries, and your downloads folder. The same goes for large apps like Office and Creative Suite. If something goes wrong, you can easily download these again from the provider. You can decide how extreme you want to be: exclude all system files and all apps? Or perhaps include a bit more, so you don’t have to manually download everything in case of problems? The choice is yours. You can also specify whether backups can be made when running on battery power or if you want a notification when an old backup is deleted.
On a new device, you can easily restore the Time Machine backup by choosing Migration Assistant during setup and selecting From a Mac, Time Machine backup or Startup disk. Then, choose the backup you want to restore.
If you want to restore specific items from a Time Machine backup, open the window for the item you want to restore. For example, if you want to restore a file that you accidentally deleted from your Documents folder, open the Documents folder. In the Time Machine menu, choose Enter Time Machine or click Time Machine in the Dock, and search for the items you want to restore. You can use the timeline on the edge of the screen or the up and down arrows. Select an item and press the spacebar to preview it, and click Restore to restore the selected item. Control-click the item for other options.
iOS - Making backups with iCloud or iTunes
You can back up the information on your iPad or iPhone by making a backup with iCloud or iTunes. You can use this backup to transfer all your data to a new iOS device if you ever replace, lose, or damage your old device. We’ll explain both options below.iCloud
- Stores backups in iCloud
- Up to 2TB of storage (the first 5GB is free)
- Always encrypts backups
- Backups can be made and used wherever wifi is available
iCloud backups include almost all data and settings stored on the device, except for data already stored in iCloud (such as Contacts, Calendars, Notes, Photos, Email) and Touch ID settings. Here’s how to create a backup with iCloud:
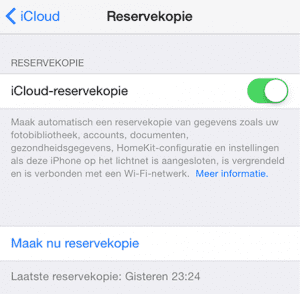
If iCloud Backup is enabled, a backup will be automatically made every day. This will only happen when the device is plugged in and connected to wifi. You can check if a backup has been made by going to Settings > iCloud > Storage > Manage Storage. Select the device, and the backup will appear with details about the time and size of the backup.
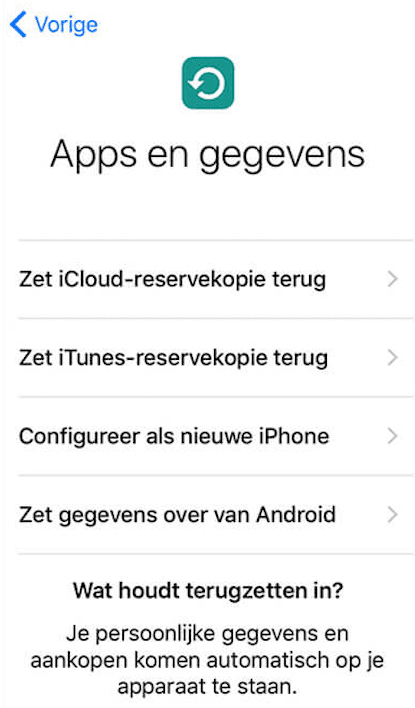
On a new device, you can easily restore the iCloud backup by selecting Restore from iCloud Backup during the setup step Apps and Data. After signing in to iCloud with your Apple ID, you can choose the backup you want to restore.
- Connect the device to wifi
- Open Settings and select iCloud
- Select Backup and make sure it is enabled
- Tap Back Up Now and stay connected to wifi until the backup is complete
If iCloud Backup is enabled, a backup will be automatically made every day. This will only happen when the device is plugged in and connected to wifi. You can check if a backup has been made by going to Settings > iCloud > Storage > Manage Storage. Select the device, and the backup will appear with details about the time and size of the backup.
On a new device, you can easily restore the iCloud backup by selecting Restore from iCloud Backup during the setup step Apps and Data. After signing in to iCloud with your Apple ID, you can choose the backup you want to restore.
iTunes
- Stores backups on a Mac or PC
- Storage depends on the available space on the Mac or PC
- Can create encrypted backups (disabled by default)
- Backups can be made and used on a Mac or PC
iTunes backups include almost all data and settings on the device, except for content from iTunes, photos already stored in iCloud, and Touch ID settings. Data from Activity, Health, and Keychain are only included when you create an encrypted backup. Here’s how to create a backup with iTunes:
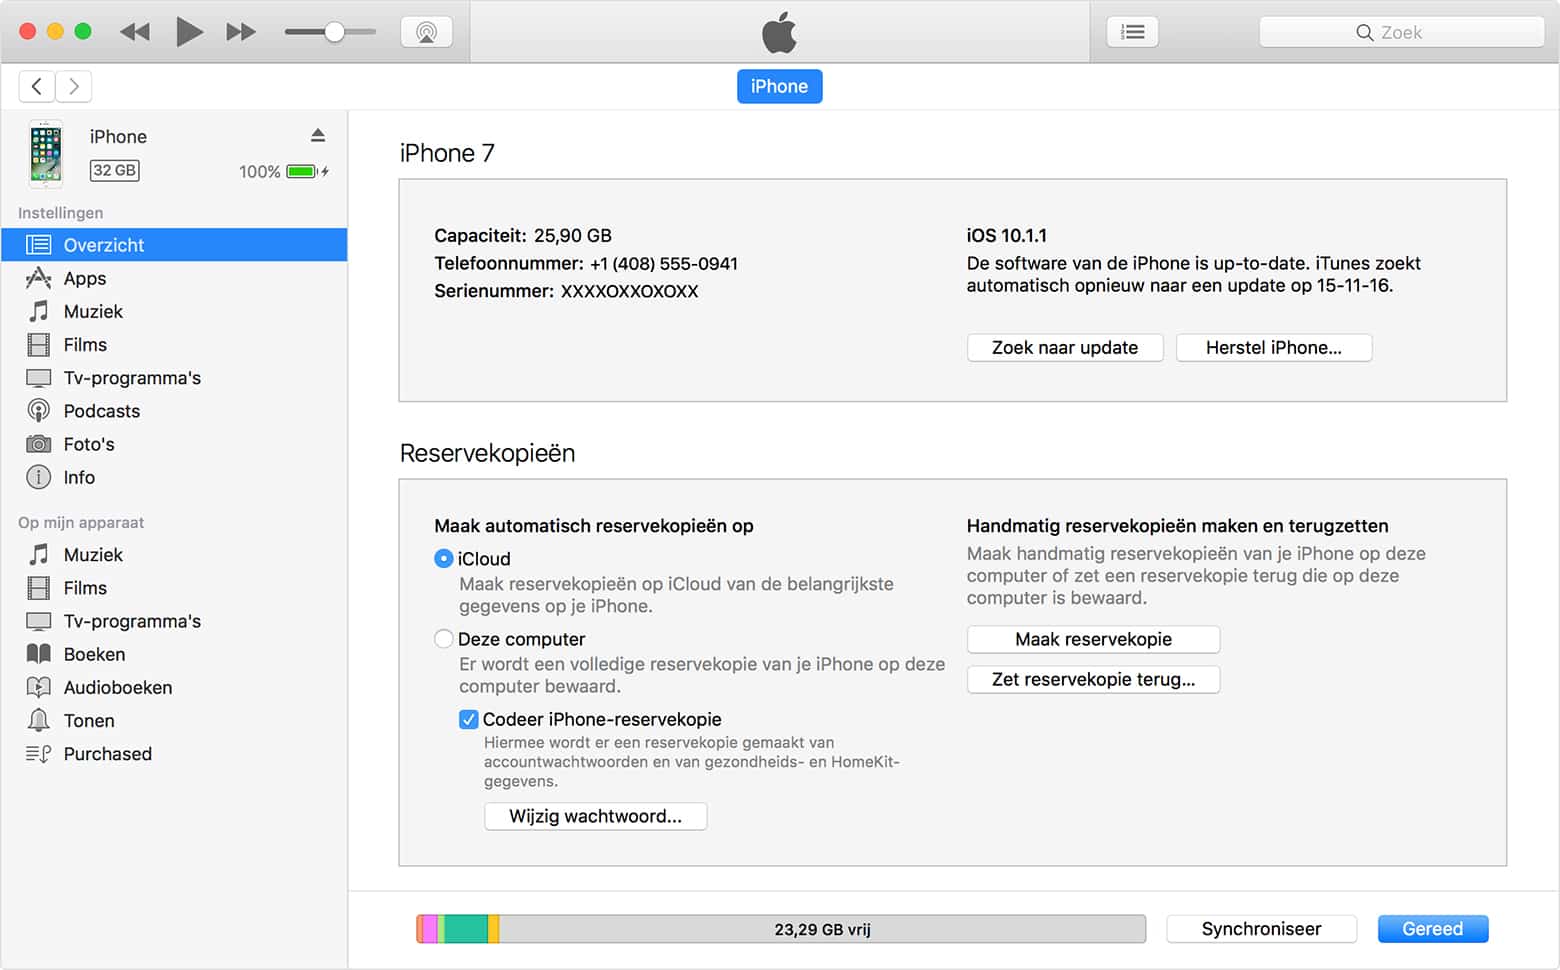
You can check if the backup was made by going to iTunes > Preferences > Devices. You will see the name of the device along with the date and time iTunes created the backup. Encrypted backups are marked with a lock symbol next to the device name.
On a new device, you can easily restore the iTunes backup by selecting Restore Backup in iTunes. Choose the correct backup and click Restore. If prompted, enter the password for the encrypted backup. Keep the device connected to the computer after it restarts until the synchronization is complete.
Simple! So don’t wait any longer and prevent losing all your files.
- Open iTunes and connect the device to the computer
- If a message appears asking for your passcode or to trust the computer, follow the on-screen instructions
- Select your iPad or iPhone when it appears in iTunes
- Click Back Up Now and do not disconnect the device until the backup is complete. If you want to save data from Activity, Health, and Keychain, select the Encrypt Backup checkbox and create a password.
You can check if the backup was made by going to iTunes > Preferences > Devices. You will see the name of the device along with the date and time iTunes created the backup. Encrypted backups are marked with a lock symbol next to the device name.
On a new device, you can easily restore the iTunes backup by selecting Restore Backup in iTunes. Choose the correct backup and click Restore. If prompted, enter the password for the encrypted backup. Keep the device connected to the computer after it restarts until the synchronization is complete.
Simple! So don’t wait any longer and prevent losing all your files.